First of all I want to to thank Jill for honoring me by allowing me to write a post for her wonderful blog Create.Craft.Love! I can see that she has many great ideas and I will definitely have to try some of her wonderful crafts!
I'm Randomly Fascinated from Domestic Randomness. I am a new mom to Little Man who is 6 months old. At Domestic Randomness you can find me sharing my thoughts on all sorts of domestic topics. I have recently been writing a series comparing major diaper brands. I also like to discuss Baby Topics, Recipes, Saving Money, Wedding Topics, Swagbucks, and other Random Thoughts. Please feel free to come visit me and let me know what you think of my random thoughts!
I have seen several projects floating around the web that use chalkboard paint and they have intrigued me. I have thought of several ideas including possibly making a small chalkboard on Little Man's wall (I love that idea, but it really doesn't match his decor) or making one out of a picture frame or mirror. So the idea of making something with chalkboard paint has been ruminating in the back of my mind for a while now. When I saw that my blog swap partner was Create.Craft.Love I knew it was time to whip up my first craft post. The idea of chalkboard paint came back to me again, but I wasn't quite sure what I wanted to do with it. I wanted it to be something that my family would use, not just something that I made because I liked the idea. This idea came to me late one night as I was trying to fall asleep (Why do the best ideas always come to me then? Good thing I keep a pad of paper by my bed to write them down). I had also seen a cool idea for some fun picture magnets which I wanted to try so I decided to combine the two and make a small magnetic chalkboard. I had an old grungy gross cookie sheet that I thought would be perfect for this project. I was originally going to show you the fun picture magnets in this post too, but I discovered that that would be a massive post so I split it into two separate posts so keep an eye out on my blog for the Fun Photo Magnet Post!
Anyways here it is, how to make a Chalkboard Tray.
Materials
- Cookie Sheet (old and grungy works fine, new would work fine too, if you don't have one that you want to use, Dollar Tree has some for $1)
- Spray paint (any color, this is for the sides) I used rustoleum (mostly because it was free because my parents had it sitting around their garage, but also because I thought it would adhere well to my old grungy pan)
- Chalkboard paint (I used spray paint, they also have it in cans if you like to roll on paint) I had quite an adventure tying to find this paint. I had checked to see if they had it at Walmart around a month ago and they did, but I didn't buy it because I was trying to be good and not buy it when I didn't have a need for it right then. Well apparently sometime in the last month Walmart decided to stop carrying chalkboard paint. So I checked JoAnns, Hobby Lobby, Lowes and Michaels. I didn't see it at Hobby Lobby. I found it at the other 3 stores, but I wasn't willing to pay the $7.99 JoAnns was asking and Lowes only had it in cans and I didn't feel like dealing with a brush or roller. I ended up buying it at Michael's. They had it for $7.49 (I think) and I used a 40% off coupon from JoAnns (which I had forgotten about when I was at JoAnns or I would have used it there) which took $3 off so I got it for $4.49!
- Newspaper or tarp to put under the sheet while spray painting
My old grungy pan
Prep your area, I suggest doing this outside because of fumes and mess
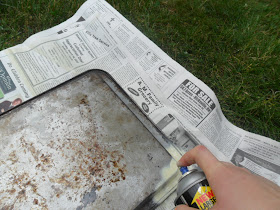
Spray on your base coat
The center does not need to be as well covered since we will be spraying the chalkboard paint there. Wait for a while for first coat to dry (at least 30-60 min)I did have some trouble with newspaper sticking to it, so if you are not time crunched I would wait a little longer, maybe do one side one day and the other side another day.
Flip over and spray the other side.
Wait while drying again.
I did 2 coats on the bottom and 3 coats on the top (it just looked like it needed it).
Let dry overnight.
Do the front side of the pan (the side that dips in) first!
Cover edges with painters tape. One thing I learned is that if you wrinkle the tape at all the paint will bleed down into it, so make sure you tear your strips small enough that you don't have to wrinkle them around the corners. Also make sure that you press down around the edges so they are tight against the pan, because again, the paint will bleed in any small crack.
Spray on chalkboard paint. Let dry for a while. Since this is just in the center, not around the edges, you only need to wait 30-60 min.
Spray again. I did 3 coats on each side (The Bottle said 2 was needed, but I did 3 just to be safe) Let it dry in between each coat.
Peel the tape off.
Flip over and do the other side.
This is the front side done.
This is the back side done
The bottle said to cover the whole chalkboard in chalk and then wipe it off to break it in.
The great thing about these chalkboards is that cleanup is easy, just rinse with water (no soap needed)!
You can use it to write messages
It would be great for kids to play games in the car.
Or make a street for toy cars (look at my Fun Photo Magnets for some magnet car toys)
It would also be great for snacks and in the car because it has edges and super easy clean up. Very Versatile!
I plan to use it as a sign for my sister's coffee themed bridal shower
It could also be used to tell the family what is for dinner
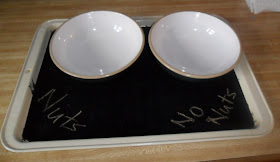
Or as a try to distinguish what is in different dishes
What would you use it for?
Thank you again to Jill and to her wonderful readers! I am very grateful to you for allowing me to post my random thoughts on you blog! I can't wait to see what she has for us next!
I hope that you enjoyed my craft! I would love it if you would stop by and visit me at Domestic Randomness. If you want to stay a while you can subscribe by email, RSS feed, Google Friend Connect, pinterest, or facebook.
Linked Up To:
Clean and Scentsible, Uncommon, Nap Time Crafters, Frugal Girls, While He Was Napping, A Pinch of Joy, Serendipity and Spice, Cornerstone Confessions, Ready 4 Summer, Summer BBQ Party, Shaken Together, My Favorite Finds,


Such a clever idea!
ReplyDeletethanks!
DeleteWhile it's not too difficult to choose baking sheets for making cookies or for other baked goods, there's a few things you might want to consider. And when it comes to bakeware construction, there's lots to choose from.
ReplyDelete