Tuesday, July 31, 2012

Mini Fruit Pizzas

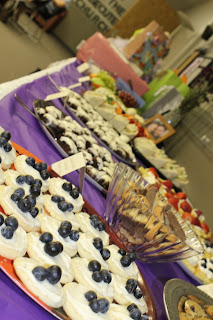
This is actually one of the first things that I pinned for my sister's shower (well this and the towel cake). I love this idea. I love fruit pizza but it can be a little difficult to serve neatly or individually. And as an added bonus these mini fruit pizzas are super easy to make. Possibly one of the easiest things that I made for the shower. The hardest part is putting them together. The ones I made were not quite as cute as the originals because we ran out of time before the shower to get everything together (the downside of hosting a shower on a Sunday at 2:00 at a church) so we only had time to put blueberries on them. I had planned to put strawberries and kiwi on them too. Also I had a lot fewer of these than I had planned to have because I dropped the container on the way into the church and spilled about half of them on the sidewalk :( . Oh well, that's life right? Things don't always turn out exactly how you want them to but they can still be good. And these were good, very good. So give them a try and see how they work for you!


Mini Fruit Pizzas
(recipe made from looking at this picture)

Ingredients:
  • Sugar Cookies
  • Cream Cheese Frosting
  • Fruit (any type of fruit that you like on fruit pizza. Any berries are great, kiwi is good, several others are good too)

Directions:
 
  1. Bake sugar cookies. I used store bought cookie dough because I knew that I had to cut a few corners in order to get everything done. If you have time and desire you can make these cookies from scratch using your favorite sugar cookie recipe. I personally would probably go ahead and use store bought cookie dough because I do not think that I make the best cookies, but you can use whatever you prefer.
  2. Make or buy cream cheese frosting. I made my own because I was already making it for the Nutella Brownies. Otherwise I would have bought a can of cream cheese frosting and it would have worked out fine. Here is my recipe for Cream Cheese Frosting, if you want to use it.
  3. Cut up the fruit if needed
  4. Frost the cookies
  5. Arrange the fruit on the cookies
  6. Enjoy! They are super yummy!


Linking up to:
Nap Time Crafters, While He Was Napping, Cornerstone Confessions, A Pinch of Joy, Addicted to Recipes, Serendipity and Spice, My Favorite Finds, Claiming our Space, Frugal Girls, Blissful and Domestic


Saturday, July 28, 2012

DIY Sugar Cubes (partial fail)

I made a lot of stuff for my sister's shower. A lot of stuff. And most of it turned out good, really good, or fabulous. But a few things did not turn out as I expected. This was one of them. I am sharing it with you because that is just the way I am. I like to share my failings as well as my accomplishments (well some of them :) .

I found this recipe for DIY sugar cubes. They are absolutely adorable and I thought I would make them for the shower. They were super simple to put together. Less than 5 minutes!


Ingredients:
1c Sugar
1 1/2 T Water
Flexible ice/candy tray (fun shapes recommended)


Directions:

Mix sugar and water. Start with less water and add to it until it is the right consistency. You want it to still be grainy but wet enough to manipulate.
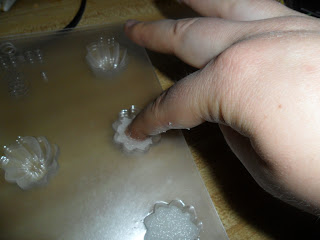
 Press into molds
Let dry. This is the part where my project failed. The original post said theirs dried overnight. Mine were nowhere near dry. I was curious so I left them sitting out to see how long it took them to dry. Two weeks later they were still wet. Well the white sugar ones were still wet. The brown sugar ones had dried after a couple days or a week I think. I used 2 T water for the white sugar cubes and 1 1/2 T water in the brown sugar cubes. That is part of it I think. Also the trays I used were technically candy molds and they were not flexible enough to get the sugar cubes out until they were completely dry. I now have a silicone ice cube tray. I am thinking about trying this again. If I do I'll let you know how it turns out.

The brown sugar ones turned out pretty cool!


What do you think? Are you going to give it a try?


Linking up to:
Nap Time Crafters, While He Was Napping, Cornerstone Confessions, A Pinch of Joy, Addicted to Recipes, Serendipity and Spice, My Favorite Finds,


Tuesday, July 24, 2012

One Lovely Blog and Very Inspiring Blogger Award

I got an award for this blog this week! Hilda from From Overwhelmed to Organized has given me the One Lovely Blog and Very Inspiring Blogger Award! Thank you Hilda! I have enjoyed reading your posts and seeing different areas in your home transform into tidy organized spaces. It is so encouraging! And I too wondered if they were two separate awards until I read that you had looked into it :)

So the way this award works is that the receivers must:
  • Thank the person who nominated you and link back to them in your post.
  • Share 7 things about yourself.
  • Nominate 15 bloggers you admire.
  • Leave a comment on each of their blogs letting them know they've been nominated.

So here it is!


7 Things About Me:
  1. I don't really care for chocolate (Yes I am a woman and I did just say that). Although to be clear I don't care for plain chocolate, I love brownies, chocolate cake with peanut butter frosting, snickers bars, and much more!
  2.  I love doing almost anything creative. I love to make crafts, paint, crochet, sew, cook, dance, play with children, etc.
  3. For some reason even though it is creative I can't seem to get into music. I prefer to listen to movies and tv shows while I am working and I don't have the discipline to learn a musical instrument. I do like to sing though.
  4. My favorite artistic medium is Ceramics. It is my dream to someday own a kiln and possibly a wheel of my own so that I can work on ceramics again. Unfortunately it is the most expensive and space consuming medium, but it is so relaxing and fun for me, I really want the chance to do it again. 
  5. I absolutely love being a mother. I have wanted to be a mother for as long as I can remember and it is just as amazing, if not more so, than I ever thought it would be. I am so thankful for my Little Man and all the blessings he brings to my life!
  6. I have a huge family. My dad's side kinda reminds me of My Big Fat Greek Wedding (minus the Greek part) and my mom's side is not tiny either. Both sides of the family are really close and anytime we get together it is always a lot of fun!
  7. I was home schooled for one year in eighth grade. My husband was home schooled all the way through high school. (We actually met at a home school event during the year I was home schooled) Because of my bad experiences in public school and my husband's good experiences in home school   we both agree that we would like to home school our children.

15 Blogs I Admire (in no particular order)
  1. The Frugal Girls
  2. Cornerstone Confessions
  3. Living It! 
  4. Serendipity and Spice
  5. Clean & Scentsible
  6. Uncommon
  7. My Favorite Finds
  8. Naptime Crafters
  9. Blissful and Domestic
  10. My Blessed Life 
  11. Bent On Better Lunches
  12. Six Sisters Stuff
  13. White Lights on Wednesdays
  14. Create.Craft.Love.
  15. Five Little Chefs

    All of these blogs are great and I definitely recommend checking them out!

    Thanks again to Hilda for giving me this award! I am very honored to be recognized in this way!


    Saturday, July 21, 2012

    My very first Sponsor Spotlight!

    If you are interested in joining the Domestic Randomess sposor family I still have several spots available. And I am running a special right now, get an advertising spot for free or half off! Find the details about this special here.

    Anyways on to the sponsors!


    Summerfun2

    Two Succulent Sisters is about two sisters, their crafts, home life, grandkids, cooking and everything in between. Many of the posts are tutorials because we decided early on that we wanted to show others how to do the crafts and sewing that we do. Linda lives in Connecticut and Carol lives in Pennsylvania. When they get together it is one large craft fest. Carol and Linda both take care of their grandchildren on a regular basis and enjoy their antics, especially when it comes to SUMMER FUN!! They both love to swim and get involved in fun summer activities, hence the "Summer Fun" ad with all the links to fun in the summer. Go check out their wonderful blog and all of their summer fun posts!


    My_button

    Cornerstone Confessions is a mommy blog covering topics such as organization, home schooling, recipes, book reviews, blogging tips, and more. It is written by Kathy a wife and mother of 2 girls. She enjoys reading, writing, home schooling, and organizing when she's not blogging for Cornerstone Confessions. I really love the way Kathy successfully merges everyday issues and faith. Her faith is so integrated into her blog that it would be difficult to separate one from the other. I absolutely love that. But don't take my word for it, go over and check it out!


    Serenity_you_logo_250x250(1)
    Natasha is a UK wife and mother of 3 children. She writes Serenity You, a wonderful blog about family, life, recipes, tips, crafts, kids play ideas, photography and a little bit of everything else. She has an etsy shop, and weekly linky party that are definitely worth looking at and linking up to. Hop on over and check out her great blog!


    Lucky 8 is an ebay store, they sell women's clothes, children's clothes, children's items and handmade items. The link takes you to their facebook page where she posts about the wonderful things that she sells on her ebay store. She also lets you know how much time is left on her auctions. Stop on over and check out her items!


    Thank you to my wonderful sponsors! I am so glad to have you as part of the Domestic Randomness family!


    Tuesday, July 17, 2012

    DIY Flavored Water (Strawberry Watermelon and Three Citrus Water)

    I did a lot of blog browsing to find great recipes to use for the bridal shower. One of the recipes I found was for flavored water. I thought that this was a genius idea that I had to try. It is so unique and pretty. I thought it added an extra touch of fanciness to the shower.
    I am not super into flavored water. I actually like the taste of plain water (I love well water, yes I know I am weird). I prefer either full flavor drinks or plain water. I don't really care for watered down drinks. But for flavored water this is pretty good. I enjoyed it.
    I made two types of flavored water Strawberry Watermelon and Three Citrus. You could make whatever flavors sound good to you. You could recreate your favorite flavored water with just a few ingredients!

    DIY Flavored Water

    Ingredients:
    Fruit (1-2 c per container whatever type is in season or that you like)
    Ice
    Water
    Glass Jars or pitchers
    Utensil to press on the fruit


    Directions:

    Cut Strawberries up, put in glass container and press a little with utensil.
     Add watermelon and repeat
     Add ice
     Add water
     For the citrus water put in the fruit and press.
     Again add fruit and water.
    Refrigerate overnight.The next day strain out the fruit. Taste and see if it is to your taste.
    I thought the waters were a little strong so I watered them down. I sweetened the citrus water with honey and sugar because it was a little bitter.


    They came out looking beautiful and tasting good. I personally preferred he strawberry watermelon water because it was naturally sweet and I find the rinds of the citrus fruits to add a little too much bitterness.


    What type of flavored water do you like?


    Linking up to:
    Nap Time Crafters, While He Was Napping, Cornerstone Confessions, A Pinch of Joy, Addicted to Recipes, Serendipity and Spice, My Favorite Finds, Claiming our Space,

    Saturday, July 14, 2012

    Quick and Easy Lasagne

    Do you love lasagne? Do you wish it was easier to make so you could have it more often? Do you wish that you could decide at 4 that you would like to have lasagne tonight and have it on the table by 5:30? If so then I have the perfect recipe for you! I love lasagne and I have a great recipe that is super easy to make it. And yes the last question was an actual occurrence. A couple weeks ago I decided at 4 that I wanted lasagne for diner. We had to leave for something at 6 so we needed to be done eating by then. I had this whipped up and ready to eat by 5:30! That's how easy this recipe is. The baking takes the most time (especially if you use prebrowned meat!) so you can work on other things while it is cooking. Would you like to give it a try? Here you go.


    Quick and Easy Lasagne

    Ingredients:

    • 1 box lasagne noodles
    • 1 lb ground beef or sausage (I use ground beef, I just prefer the flavor. And of course I use my prebrowned meat)
    • Spagetti Sauce
    • 1 carton cottage cheese
    • 1T parsley
    • 1T oregano
    • 1/4 c parmesan cheese
    • 8-16 oz mozzarella cheese

    Directions:

    1.  Preheat oven to 350 degrees
    2. Cook noodles according to package instructions
    3. Brown and drain meat (or thaw frozen prebrowned meat) add spagetti sauce
    4. Mix cottage cheese, parsley, oregano, and parmesan cheese
    5. Spread 1/5 sauce mixture in bottom of big casserole pan
    6. Top with (layered)  1/4 box of noodles, 1/5 sauce mixture 1/4 cottage cheese mixture , 1/4 bag mozzarella cheese.
    7. Repeat 3 more times times.
    8. Cover with aluminum foil and Bake for 30 miutes
    9. Take off alumium foil and bake for 15 minutes
    10. Remove from oven and let sit for 15 minutes
    Verdict:
    Love this recipe. So yummy and so easy! You can serve it with garlic bread (brush some butter on any kind of bread you have, sprinkle on garlic and salt, bake for a few minutes at 350) This is also a great freezer meal because it is even better if you let it sit for a while and let the flavors combine. I always make a big pan of it and we eat it for several days If we have extra I freeze a couple of portions for easy meals later.


    Linking up to:
    Nap Time Crafters, While He Was Napping, Cornerstone Confessions, A Pinch of Joy, Addicted to Recipes, My Favorite Finds,


    Tuesday, July 10, 2012

    DIY Towel Cake Tutorial

    I saw this absolutely adorable towel cake on pinterest. Unfortunately the pin was horribly done and the pinner pinned a picture that was not from the original site. The picture was from a round up, which would have been fine but the blogger doing the round up did not properly cite their source and the source just went to a picture. (For those of you on pinterest please please pin properly and pin the original site that the item was posted on, it is rude to the people looking at your pin as well as the original poster who doesn't get their credit) So I did a little more digging (looked really closely at the photo) and noticed that there was a website imprinted on the picture (which is actually a really good idea that I should probably start doing, anyone know how to do that?). So I visited the site and dug around there and finally found her post about her towel cake. Unfortunately the post did not have very many directions for how to do it so I still had to make it up on my own. She also did a diaper cake that did have some better directions, but it wasn't exactly what was needed so I thought I would post a tutorial on how I made this wonderful towel cake.


    Towel Cake 

    Materials:
    • Cardboard
    • Aluminum Foil
    • Tape (both scotch and packing)
    • 2 plastic containers (dollar tree, $1 for both)
    • Towels (I think I used 13, depending on how thick your towels are you may need more or less)
    • Utensils (I used several kitchen utensils, if you wanted to do a bath themed towel cake you  could do things like a loofah and such. You can get utensils at dollar tree for $1 each)
    • Ribbons (I used a cute colorful tissue paper (dollar tree), tulle (dollar tree), and a cute ribbon I found in the dollar bin at Michael's)
    • Filler decorations (I used tulle and raffia string from dollar tree)
    • Flower decorations (I used soap flowers I found at dollar tree)
    Directions:

    Get a cardboard square to cut your circle out of. I used a car seat base box because it was wide enough to fit a towel cake in the size I wanted. To make sure that I was cutting a square I cut off the top flap and laid it along the side.
    Cut the square into a circle.
    Cut the aluminum foil long enough to cover the cardboard.
    Use tape to adhere the aluminum foil to the back.
    The tape in the middle was not a problem because it was covered by the cake. I wish I would have cut the second sheet of aluminum foil a little longer because I had to put tape on the outer edge and it did show.
    Gather your towels. I used towels that I already owned because I had plenty extra and I knew my sister wouldn't mind. Also I considered this more of a decoration than a gift (although she did get to keep all the stuff :). If you are doing this as a present or something I would buy new towels. Last I checked Target had the best price for towels because you could get a group of them for 1 price (I had to look a little to find them, but they were there a couple years ago).
    Tape the two containers to the base. I used the containers to give the bottom layer some bulk. It would have taken a lot of towels to fill in that area.
    Fold 1 towel in fourths lengthwise and wrap around the containers. I used packing tape to stick the towels to the container and each other.
    Fold the towels in half and continue wrapping around each other. I decided that I wanted the base color of the cake to be white so I used white towels on the outside of the roll. The bottom layer was a little wide for 1 towel to cover the whole outside so I made sure the last 2 towels were white and turned the area that looked less good toward the wall.
    The second and third layers were all towels. Again tape the towels to each other. For the top layer in thirds to make it shorter.
    Stick skewers through the middle to keep the layers together.
    Before decorating
    Use the ribbons to decorate the layers. I used tissue paper cut into strips, tulle, and brown sheer ribbon. Experiment a little until you find a good combination.

    Choose a utensil to be the cake topper. Wrap some of the ribbon around it and tie a bow.
    Decorate with utensils
    Stuff tulle into the towels between the layers
    Stuff in any other fillers you are using
    Decorate with fake flowers
    Up Close


    Doesn't This look Great? I love how it turned out! It was the perfect decoration for the gift table!


    Linked Up To:
    Shaken Together, Serendipity and Spice, My Favorite Finds, Clean and Scentsible, Uncommon, Cornerstone Confessions, A Pinch of Joy, Nap Time Crafters, Frugal Girls, While He Was Napping,


    Related Posts Plugin for WordPress, Blogger...