Showing posts with label dessert. Show all posts

Friday, November 13, 2020

Healthy Dairy Free Frosty


We found this recipe in Eat Like A Dinosaur. We first made it in Cooking Class. Honestly the kids didn’t like it, they all gave it back (I think it was too strong and rich for them, even with added banana). But Chris and I loved it! It reminded us of a Wendy’s chocolate frosty. The original recipe called for dates, but I didn’t find them necessary. This is a sugar free, dairy free frosty / milkshake. And it is delicious!

Let’s talk about the ingredients

Avocado - healthy fat, lots of vitamins etc. adds a heathy boost and also makes the frosty smooth, creamy, and thick.

Banana - a sweet fruit that is great for sweetening smoothies :). It is higher carb so definitely not keto. If you are Keto / low carb and ok with a dark chocolate flavor, you might be able to eliminate the banana or substitute berries, but it will definitely be less sweet. I have not tried that but it’s worth a try. If you are not keto and you like a sweeter milkshake feel free to add more banana. You can freeze the bananas first for a thicker milk shake.

Coconut milk - I used the unsweetened stuff in the carton. You can use the full fat canned kind for a thicker higher fat milk shake. I was going for lower calorie and the carton milk worked great!

Cocoa powder - this is obviously where the chocolate flavor comes from.  But it also has some health benefits of its own. It has been linked to lowering inflammation and blood pressure, and boosting blood flow and brain function among other things.

Chocolate Greens (optional) - I use It Works Chocolate greens. It has 8 servings of veggies, 15 calories, and 2 carbs. It just adds a good boost of vegetables for a lot of nutrition, without many drawbacks. It also adds to the chocolate flavor and sweetness. You can use other brands, just check out the ingredients and nutrition label to make sure it fits with your eating goals.
(disclaimer - I am an It Works distributor, but I only benefit monetarily if you order through me 🙂. On a related note if you are interested in more info email me at domesticrandomness@gmail.com 🙂 or you can order order here.)

Meal Replacement/protein powder (optional) - I order custom meal replacement powder through True Nutrition. I love this because I am able to pick what I want in my powder and in what quantities. I picked beef protein, whole egg, sweet potato, avocado oil, etc because I would actually sit down and eat those things in a meal. They have many more choices like whey, grass fed milk, MCT, and much more. I also find their prices to be extremely reasonable. $10-16/lb for most things, depending on what you order. You can use whatever powder you normally use or leave this out 🙂.
(Use the code domesticrandomness at checkout for 5% off your order. I believe it can be combined with their bulk order discount)

Powdered Coffee (optional) - I use It Works Skinny Brew for a dairy free coffee powder. It has a french roast coffee taste. And it has added energy, brain boosting, focus, and fat burning ingredients!
(disclaimer - I am an It Works distributor, but I only benefit monetarily if you order through me 🙂. On a related note if you are interested in more info email me at domesticrandomness@gmail.com 🙂 or you can order here.)


Ice- this one is fairly obvious, it makes the frosty cold and thicker. Especially if the bananas are not frozen. Also adds water, which most of us need more of. 🙂


Healthy Dairy Free Frosty
Serves 2

1 Avocado
2 ripe bananas
2 c unsweetened coconut milk
1/4 c cocoa powder
2 scoops Chocolate Greens (optional)
2 scoops meal replacement/protein powder (optional)
2 packets powdered coffee (optional, for a mocha frosty)
4 handfuls of Ice

Put all ingredients in blender, blend until well mixed.
Serve and enjoy!


Nutritional info (without the optional powders)
307 calories
31g net carbs
46g total carbs
16g fiber
18g fat
7g protein


Paleo, low calorie meal replacement, clean eating, gluten free, dairy free, soy free, sugar free, sweetener free, allergen friendly, healthy milkshake, low carb


Friday, September 21, 2012

Friday Fascinations 7 - Everything Linky Party - Chocolate Peanut Butter Crescent Rolls

This week we are going to do an everything linky party. You can link up anything that you have been working on, thinking about, writing about, whatever. Literally any post of yours that you would like to share with my readers link it up!

Oh and if you have a linky party that you would like me to visit please link it up in the Places to Party tab above. I love visiting parties and when I have time I go to that tab and visit all the parties that are open at that time.


Today I am going to share with you one of the easiest snacks i have ever made. I found this picture on pinterest and decided to recreate it. I made it for a carry in meal at a friend's house. I chose it because I didn't have a lot of time and I needed something I could make pretty quickly. This fit that bill and it was also super yummy!


Chocolate Peanut Butter Crescent Rolls
 
Ingredients:
  • Crescent Rolls
  • Peanut Butter 
  • Chocolate Chips

Directions:
  1. Unroll crescent rolls
  2. Spread peanut butter on crescent rolls
  3. Sprinkle chocolate chips on peanut butter
  4. Roll up like crescent rolls
  5. I added a dab of peanut butter and a chocolate chip on top so that people would know they weren't just crescent rolls, this is optional, but it makes them look cute! :)
  6. Bake according to package directions (You can add a few minutes to the cooking time if it looks like they need it)
Verdict:
That's it. How easy is that? And these are super yummy! They are great for making ahead and serving later. They are yummy warm, but they are even better the next day. I tried these warm and later that day and the next few days and they were great each time!

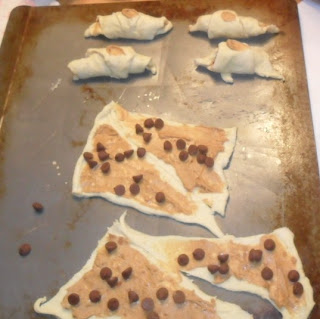
Here are some pictures of the process:


This is what they look like on the inside


Linky Party 

The rules:


  •  For this party you may link up anything that you have been working on - crafts, recipes, random musings, etc. I do not mind links to giveaways or parties as long as you state that it is a giveaway or party in the title. Link up whatever you want just please be honest in the title. I do some themed linky parties sometimes, but this one is a free for all!
  • Please follow me in some way. If you absolutely hate my blog then of course don't follow it, but if you hate it should you really be linking up? (I leave that for you to answer :) There are several ways to follow me offered on the right sidebar.
  • Link up directly to the post, not your home page.
  • By linking up you are giving me permission to feature your post including but not limited to pictures and quotes from your post, and also to feature your post in my various social media outlets.
  • This is a family friendly, christian blog. I reserve the right to remove a link to any content that I find offensive or not compatible with this blog, with or without notice.
  • Please add a back link or my button to your blog or post somewhere. You can find my buttons on the left sidebar.
  • Please check out some of the other links and leave some love in some way (comment, pin, follow, etc.)
Oh and I'd love it if you would take a button!


Tuesday, July 31, 2012

Mini Fruit Pizzas

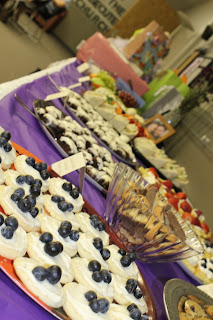
This is actually one of the first things that I pinned for my sister's shower (well this and the towel cake). I love this idea. I love fruit pizza but it can be a little difficult to serve neatly or individually. And as an added bonus these mini fruit pizzas are super easy to make. Possibly one of the easiest things that I made for the shower. The hardest part is putting them together. The ones I made were not quite as cute as the originals because we ran out of time before the shower to get everything together (the downside of hosting a shower on a Sunday at 2:00 at a church) so we only had time to put blueberries on them. I had planned to put strawberries and kiwi on them too. Also I had a lot fewer of these than I had planned to have because I dropped the container on the way into the church and spilled about half of them on the sidewalk :( . Oh well, that's life right? Things don't always turn out exactly how you want them to but they can still be good. And these were good, very good. So give them a try and see how they work for you!


Mini Fruit Pizzas
(recipe made from looking at this picture)

Ingredients:
  • Sugar Cookies
  • Cream Cheese Frosting
  • Fruit (any type of fruit that you like on fruit pizza. Any berries are great, kiwi is good, several others are good too)

Directions:
 
  1. Bake sugar cookies. I used store bought cookie dough because I knew that I had to cut a few corners in order to get everything done. If you have time and desire you can make these cookies from scratch using your favorite sugar cookie recipe. I personally would probably go ahead and use store bought cookie dough because I do not think that I make the best cookies, but you can use whatever you prefer.
  2. Make or buy cream cheese frosting. I made my own because I was already making it for the Nutella Brownies. Otherwise I would have bought a can of cream cheese frosting and it would have worked out fine. Here is my recipe for Cream Cheese Frosting, if you want to use it.
  3. Cut up the fruit if needed
  4. Frost the cookies
  5. Arrange the fruit on the cookies
  6. Enjoy! They are super yummy!


Linking up to:
Nap Time Crafters, While He Was Napping, Cornerstone Confessions, A Pinch of Joy, Addicted to Recipes, Serendipity and Spice, My Favorite Finds, Claiming our Space, Frugal Girls, Blissful and Domestic


Tuesday, July 3, 2012

Nutella Brownies with Cream Cheese Frosting

I have made so many Nutella brownies in the last couple months that I have become sick of them. Not possible you say? Yes it is possible. I found this recipe for Fudgy Nutella Brownies that looked so amazing that I thought I must try it. However it was a make from scratch recipe and I really like the simplicity of dumping a mix and a few ingredients together, stirring, and baking. So I wanted to adapt the recipe to use a brownie mix. I did this successfully the very first time I tried it. They were amazing! The brownies are not the greatest by themselves, but with the cream cheese frosting, oh la la. The unfortunate part is that I forgot to write down the exact measurements for the ingredients so I have since made way too many pans in an attempt to recreate those first delicious brownies. And since these brownies are in no way low fat and there are only 2 of us eating solid food in this house I didn't want to just make pan after pan just for us because I know that I would end up eating most of them by myself and gaining about 20 pounds which I really don't need because I'm still trying to lose a little of the baby weight. So I only made them for functions. So basically every function I took food to in the last couple months got a pan of brownies. I think it is possible that my friends and family got sick of Nutella Brownies too :). However I think I have gotten it, I think this is the recipe. Hopefully you will enjoy this recipe as much as I did the first few times! And maybe, I will be able to make them again sometime soon :)

I did in fact try the original recipe too because it looked amazing and not that difficult ad also because I wanted to see how my adaptation stacked up next to the original recipe. And I found that the Fudgy Nutella Brownies are absolutely amazing, and not an incredible amount of work for a made from scratch recipe, really it is a great recipe. However this adaptation is also pretty amazing, in a slightly different way. How do they compare? The Fudgy brownies really are more fudge-y. I made two pans of them for a bake sale and one of the pans barely set up, it stayed soft and grainy like fudge. My brownies are more like a brownie (like a brownie made from a mix) They are firmer and more (for lack of a better word) cake/brownie like. Both are a little plain without frosting. Both are absolutely delicious with frosting. If serving at something like a bake sale I recommend cutting off the edges because they are not as high quality or delicious because they have less Nutella. I also definitely recommend drizzling the Nutella on the top like I did because it makes them look really fancy and it adds just a little bit more Nutella flavor, which is good. So in ay case I Love Love Love both recipes and both are definitely worth trying. Please let me know if you try either recipe and what you thought of them :)

Oh and one thing I wanted to share with you, I tasted these brownies at varying times ranging from the same day they were made to several days or a week later. I think these actually taste best after sitting in the fridge for a couple days. It cools them down, lets the frosting set up, and allows the flavors to mix. So feel free to make these a couple days before the event. They will actually taste better! (This tip is specific to my recipe I didn't get the chance to try the other recipe more than one day after making them)

Anyways, without further ado ...

Nutella Brownies

(adapted from Fudgy Nutella Brownies)

I made Nutella Brownie Bites for my sister's shower

Ingredients:
  • 1 Brownie Mix (whatever brand you like, I used a couple different brands)
  • 3/4 c butter (melted) or oil (the first amazing time I used butter and it was very good, very rich. 1 time I used oil because I wanted to make some lactose free for Mr. Random, it was not quite as good, but still good)
  • 1/4 c water
  • 3 whole eggs
  • 2/3 c Nutella, separated (I have to admit I didn't actually measure this in any way, I just eyeballed it to see how much I thought should be on it)
Directions:

 Preheat oven to 350 degrees. Grease your pan.
 Mix together all ingredients except Nutella.
 Spread mixture in pan
 Spoon Nutella on top of mixture
 Use spoon to spread Nutella all over brownies
Bake at 350 for 25 to 30 minutes or until done (for brownies you can do the toothpick test, it should come out solid, but still damp and clinging to the toothpick. It will still be fully cooked, but it will be more fudge-y.)
Allow to Cool. Frost Brownies with Cream Cheese Frosting. The first can of Nutella I got was a lot more stiff than the second one (yes I was a Nutella virgin before this so I didn't know what it was supposed to be like). The can says not to microwave Nutella but I did microwave it just for a few seconds, to liquify it enough to get it to swirl well. Run the edge of a spoon both ways through the Nutella and frosting to create the swirl design.
Don't They look yummy!


Linked Up To:
Clean and Scentsible, Uncommon, Cornerstone ConfessionsA Pinch of Joy, Addicted to Recipes, My Favorite Finds, Shaken Together, Serendipity and Spice, Nap Time Crafters, Frugal Girls, While He Was Napping,


Monday, June 25, 2012

How to Save Money and Food: Frozen Cream Cheese Update

Since my post about Freezing Cream Cheese and Butter seemed to be pretty popular, and several people told me that they are now freezing cream cheese because of that post, I thought that I would update you on what else I have learned about freezing cream cheese. I have been using a lot of my frozen cream cheese lately (mostly in cream cheese frosting, some dip, a couple cheesecakes, some biscuits, but a lot of frosting (for Nutella Brownies, recipe to come)) so I have learned a little bit more about frozen cream cheese that I thought I would share with you.

One thing that I learned is that frozen cream cheese works fine for dips and frostings. It is just as creamy as unfrozen cream cheese (or maybe almost as creamy, I actually haven't used much unfrozen cream cheese lately, I don't know, either way it works just fine). All you have to do is microwave it on defrost for a little bit and then stir together the solid cheese and the watery stuff that comes off it and keep stirring until it is creamy. I used a fork each time and it worked just fine.

Another thing that I learned is that Real Cream Cheese definitely comes out better after being frozen than the lower fat variety. Well actually the main difference is the creaminess. The taste of both comes out about the same as before. But real cream cheese comes out very creamy after being frozen (if you use the method described above) but the lower fat cream cheese comes out kinda lumpyish. Basically it has very small lumps in it that won't go away no matter how much you stir it.

These are cream cheeses that were frozen. The top two blocks are real cream cheese and the bottom one is low fat cream cheese. I don't know if you can see it but the real cream cheese is definitely creamier. So if you are making frosting or dip the real cream cheese is better for that. Or if you are making a lot of it you can mix the two together and no one will know the difference. For baking I suggest using half real and half fake (because it makes it slightly lower fat but keeps the great taste and texture), but really any combo works.

Another thing that I learned which is unrelated to freezing (I think) is that you should always cream your cream cheese before adding other ingredients to it. My sister and I made some cheese cake bites for the shower and we forgot to cream the cream cheese first (we actually used unfrozen cream cheese so I didn't know if it would be necessary) and it came out lumpy. No matter how much we mixed it, it wouldn't stop being lumpy. So just to be safe whether you are using frozen cream cheese or unfrozen always cream it before adding anything else (creaming with a fork works fine, or a mixer works too).


What about you? Do you have any tips for working with Cream Cheese?


Linked Up To:
While He Was Napping, Clean and Scentsible, Uncommon, Cornerstone Confessions, Serendipity and Spice, A Pinch of Joy, Addicted to Recipes, My Favorite Finds,


Thursday, June 21, 2012

Cream Cheese Frosting

I have made a lot of cream cheese frosting lately. And by a lot I mean A LOT. Why? you ask. Because I have been making a lot of Nutella Brownies, and Nutella brownies demand cream cheese frosting. Why have I been making so many Nutella brownies? Because I am crazy. And because when you find a new favorite recipe and then share the yummy deliciousness with others they start demanding (or nicely requesting) them at functions. And when you are adapting a recipe and you make it once and it turns out great then you want to recreate it and if you can't remember the exact measurements you will make many many batches until you finally find the right combination. Especially if you want to post the recipe on your blog and you want it to be perfect for your wonderful readers. So anyways I have made a lot of cream cheese frosting lately so i thought I'd share the recipe. This frosting was made with my frozen cream cheese and butter. And also demonstrates how frozen cream cheese can be used in dips and frostings and can be just as creamy as unfrozen cream cheese. See my frozen cream cheese update for tips on using frozen cream cheese.

Cream Cheese Frosting
I got the recipe here and adapted it slightly.


Ingredients:
  • 1 8oz block of cream cheese (I used frozen of course :)
  • 4T butter (melted, I also used frozen for this)
  • 1T vanilla
  • 2-6c powdered sugar (use as much or as little as you need, based on how stiff/thick you want it to be and how sweet you want it, less powdered sugar will mean more cream cheese flavor but it will be less thick, and do remember that it will set up some in the fridge, but not completely)


Directions:
Thaw the frozen cream cheese on defrost in the microwave. Stir with a fork until fairly creamy. Melt butter.

Add butter and vanilla and mix. Slowly add Powdered sugar and mix until it is the desired thickness and sweetness.

This is what it looks like when done. Can you tell the cream cheese was frozen?


What is your favorite thing to put cream cheese frosting on?


Linked Up To:
Summer BBQ Party, While He Was Napping, Uncommon, Clean and Scentsible, My Favorite Finds, Naptime Crafters, Frugal Girls, Cornerstone Confessions, Serendipity and Spice, A Pinch of Joy, Addicted to Recipes,


Thursday, May 17, 2012

How to Save Money and Food: Reconstituting Stale Marshmallows

I have a feeling that most of you think that we blogger moms have it all together. That we have our whole lives organized in a binder, we whip up crafts every day, and every recipe that we try turns out great. (I know that you are thinking that because that's what I thought before I started blogging). The truth is we are just people, just women, just moms like you. To illustrate that point I thought that I would share with you a flop turned fabulous (well turned ok and not flopish :)
For some reason I have the hardest time keeping marshmallows fresh, I guess I just don't eat them often enough (which is not really a bad thing :). And they always get hard before I use them. I have tried in the past to make rice krispie treats out of these dried out marshmallows and it didn't work out so well, apparently dried marshmallow don't melt well. One time I tried using lot of butter but that obviously is not a great idea. Another time I tried using milk but it soaked into the rice krispies and the treats were soggy. So this time I again had some dried out marshmallows, and I again wanted to make rice krispie treats (I know I am a glutton for punishment, I could just use them in hot chocolate or smores, but I had 2 bags of marshmallows, that's a lot of hot chocolate and smores). So I got the idea to look up what to do with dried out marshmallows, how to reconstitute them so that they would melt again. I found The Fat Dollar who wrote an entire article about things to do with stale marshmallows they said that to reconstitute marshmallow you can put them in a ziplock bag with a piece of bread. I did this and it did make the marshmallows soft again, but I think because I had so many marshmallows 1 piece of bread didn't do it, I didn't want to waste all my bread with this experiment so I didn't add any more. I went ahead and started the rice krispie treats and of course the marshmallows would not melt again. So I remembered that another tip on The Fat Dollar was to microwave the marshmallows with a bowl of water. I figured that if you can microwave them with water then you can add water to them while cooking. So I added water to the marshmallows and it worked! I added a little bit at a time until the marshmallows were all melted. The marshmallows melted and the rice krispies were not soggy. I also learned from The Fat Dollar that you can store marshmallows in the freezer and they will not go stale. I think I will try that next time, but if I have stale marshmallows again I will know what to do.

 My dried out, stale marshmallows
 The marshmallows with bread in the bag
Another tip from The Fat Dollar: For marshmallows that are sticking together add some powdered sugar to the bag and shake, this will separate the marshmallows.
 My marshmallows are not melting
After they are melted.
I always add peanut butter to my rice krispie treats.
 I don't worry about shape with my treats. They taste good no matter what shape they are!


Linked up to:
Uncommon, Frugal Girls, Nap Time Crafters, Women Living Well, Serendipity and Spice, A Pinch of Joy, Mom on Timeout, Growing Home, While He Was Napping,

Thursday, March 8, 2012

Cinnamony Goodness from pinterest

Today I made this awesome yummy cinnamony goodness bread. I found the recipe for it here and pinned it on pinterest so I would remember later (click the red p button if you want to follow me on pinterest Follow Me on Pinterest). So today I pulled up that recipe and made it, but I adapted it a little so I will post what I did. It is like a cinnamon roll in loaf form (which actually makes it slightly easier to make because you don't have to roll, it up and cut it with floss, and more of it is inside which we all know is the good part :) ). It turned out awesome! So anyways here is what I did.
First I made the dough. I made the dough in my bread machine, because I am busy and I don't have time to knead the dough and time its rising (we were hosting our family group party here and I had to clean and cook today, so I really didn't have time, not that I have a whole lot of time other days either :) ). So anyways, I used the recipe from the bread machine cookbook to make the dough. This step takes about 1-1.5 hours depending on how fast you are at throwing ingredients in a pan and how fast your bread machine is.
Then I put flour on the counter and rolled the dough until it was thin (maybe 1/4 -1/2 in thick, i didn't really measure it)
Then I melted somewhere around 2 T of butter and poured it on the bread and spread it around with the back of a spoon.
Then I mixed a little bit of cinnamon and a lot of sugar together (sorry, I am one of those cooks who just kinda looks at it and thinks it looks about right, so no I did not measure it, If you need help making cinnamon sugar contact me and I will measure it for you :) ) and sprinkled the cinnamon sugar over the butter and spread it so there was cinnamony goodness covering all of the dough.
Then I cut the dough in strips around 2 in wide. I peeled them off the counter, piled them together and cut them in squares like the original recipe suggests. Sorry I didn't take any pictures my guests arrived during step 2 so I was doing all this while talking and entertaining, maybe I will make it again soon and get pictures then.
Then I put the squares in a bread pan and baked it at 400 degrees. I have no idea how long it baked because like I said I had guests here and I totally forgot to set a timer, and just remembered it partway through diner and checked on it and it was perfect, so I got lucky. I think it was probably somewhere between 1/2 hr and 1 hr but I'm not sure, so if I were you I'd check it a couple times and when it looks well risen and nicely browned on top it is probably done. I also stuck it in while the oven was preheating and that didn't seem to hurt it in any way.
I served it with cream cheese frosting.

Verdict:
Pure Yumminess! We had 5 couples and 3 kids here (all of the kids were under the age of 3). And everyone loved it. My husband said it was "seriously good". The one thing I might have done differently is when I was rolling out the dough, I would leave it a little thicker. When you are peeling up the strips the dough thins out a lot more and it seemed like the dough might have been a little too thin making the pieces a little hard to peel apart, but this didn't affect the taste at all just the serving. I also might try a few variations on this, like using different types of bread dough, I would really like to try it with honey oat dough. Also in the comments of the original post one lady said she tried it with savory spices instead of cinnamon sugar and it worked out really well to make a sort of gourmet bread. I think the idea of parmesan cheese and maybe a few spices that sounds yummy too! I will have to try it, and hopefully get some more pictures for you guys.


Here is the only picture I got of it. This is a picture of what was left after everyone left. I think that the only reason that there was any left is because we had so much food for supper everyone was stuffed. We had a rice bar, remind me to post about that, totally fun, and yummy!

Linked up To:

Frugal Girls, A Pinch of Joy

Related Posts Plugin for WordPress, Blogger...